Hair bonding is one of the quickest and most affordable methods to add length, volume, and style to natural hair. Many people choose this technique because it delivers immediate results without waiting months for natural hair growth. If you are considering hair extensions, understanding the step-by-step process of hair bonding will help you know what to expect and how to care for your hair afterward.
What is Hair Bonding?
Hair bonding is a hair extension technique where hair wefts or strands are attached to natural hair using a special bonding adhesive. The glue is designed specifically for hair and is applied near the roots to secure the extension.
This method is popular because it is:
-
Quick to apply
-
Cost-effective compared to other extension methods
-
Ideal for adding instant volume and length
-
Suitable for temporary styling changes
However, professional application is highly recommended to avoid hair damage.
Step-by-Step Process of Hair Bonding
Below is a detailed explanation of the hair bonding procedure used in professional salons.
1. Hair Consultation
The process begins with a consultation between the stylist and the client.
During this stage, the stylist evaluates:
-
Natural hair texture and thickness
-
Scalp health
-
Desired hair length and volume
-
Suitable hair extension type and color
Choosing the right extension ensures a natural and seamless blend with your real hair.
2. Washing and Preparing the Hair
Before bonding, the stylist thoroughly washes the hair with a clarifying shampoo.
This step removes:
-
Oil
-
Dirt
-
Hair product residue
Clean hair allows the bonding adhesive to stick properly and last longer. After washing, the hair is completely dried and straightened if necessary.
3. Sectioning the Hair
The stylist then divides the hair into horizontal sections.
Usually, the bonding process starts from the nape of the neck and moves upward. The upper layers of hair are clipped away to hide the extensions and create a natural look.
Proper sectioning ensures:
-
Even distribution of extensions
-
Comfortable wear
-
Natural hair movement
4. Preparing the Hair Extensions
Hair wefts are measured and trimmed according to the size of each section.
Extensions can be made from:
-
Human hair
-
Synthetic hair
Human hair extensions are more popular because they look natural and can be styled using heat tools.
The stylist ensures the extensions match the client’s hair color and texture.
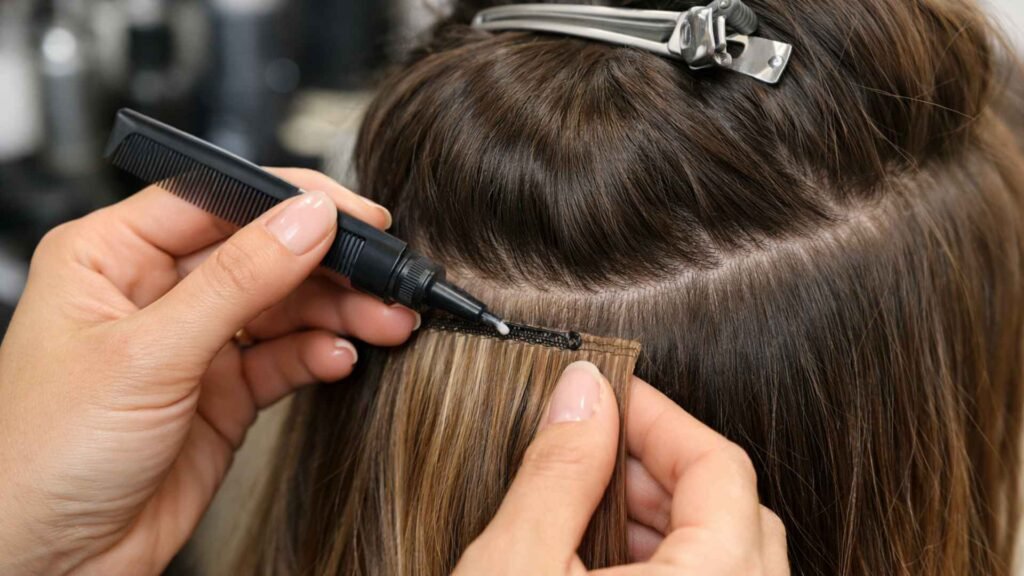
5. Applying the Bonding Glue
A small amount of hair bonding adhesive is applied to the top of the extension weft.
The stylist carefully places the glued extension close to the roots of the natural hair, but not directly on the scalp. This prevents discomfort and scalp damage.
The extension is pressed gently against the natural hair for several seconds until it sticks securely.
6. Repeating the Bonding Process
The stylist continues applying extensions section by section.
Each weft is placed evenly to ensure:
-
Balanced hair volume
-
Comfortable weight distribution
-
Natural appearance
The process continues until the desired length and fullness are achieved.
Depending on the number of extensions, the full bonding procedure can take 1 to 2 hours.
7. Blending and Styling the Hair
Once all extensions are attached, the stylist trims and layers the hair.
This step is important to:
-
Blend extensions with natural hair
-
Remove uneven edges
-
Create a natural hairstyle
After blending, the hair is styled using tools like curlers, straighteners, or blow dryers.
The final result is a smooth, natural-looking hairstyle.
Benefits of Hair Bonding
Hair bonding has become a popular option because of several advantages.
Instant Hair Transformation
Hair bonding gives immediate length and volume, making it perfect for special events or quick style changes.
Affordable Option
Compared to other hair extension techniques such as fusion or micro-link extensions, hair bonding is more budget-friendly.
Quick Application
The entire process usually takes less than two hours, making it one of the fastest hair extension methods.
Versatile Styling
Once installed, the extensions can be styled in different ways including:
-
Straight hairstyles
-
Curls and waves
-
Updos and braids
Hair Bonding Maintenance Tips
To keep bonded extensions looking good and lasting longer, proper care is essential.
Avoid Excessive Oil
Oil-based products can weaken the bonding glue and cause extensions to slip.
Brush Gently
Use a wide-tooth comb or extension-friendly brush to avoid pulling the bonds.
Wash Carefully
Wash hair with a mild shampoo and avoid rubbing the bonded areas.
Protect Hair While Sleeping
Tie hair in a loose braid or ponytail before sleeping to prevent tangling.
Regular Salon Checkups
Professional maintenance helps ensure extensions stay secure and natural-looking.
How Long Does Hair Bonding Last?
Hair bonding usually lasts 3 to 6 weeks, depending on:
-
Hair growth
-
Hair care routine
-
Product usage
-
Extension quality
After this period, the extensions should be removed or replaced to avoid stress on natural hair.
Precautions to Consider
Although hair bonding is safe when done correctly, some precautions are necessary.
-
Never apply bonding glue directly to the scalp
-
Avoid keeping extensions longer than recommended
-
Do not attempt removal without proper remover solution
-
Always consult a professional stylist for application and removal
Improper bonding can lead to hair breakage or scalp irritation.
Final Thoughts
Hair bonding is an excellent solution for anyone looking to add instant length, volume, and style to their hair. The procedure is quick, affordable, and delivers impressive results when done by a trained professional.
By understanding the step-by-step process of hair bonding, you can make an informed decision and maintain your extensions properly for long-lasting beauty.
If you are planning a hair makeover, hair bonding could be the perfect option to achieve the hairstyle you’ve always wanted.
